
It's been a while since I've posted a recipe on the blog, mostly because when I'm cooking I'm busy thinking about how great it's going to be to eat it rather than blogging! I was asked by a few people for this recipe that had seen pictures I'd taken of my last batch on instagram. I pretty much post a quick pic of all the food I make before I devour it, so if you're interested you can follow me at rebekah_d_ and pop a wee comment on anything you'd like to know the recipe for (if it's from another blog I'll link you up)!
This recipe is quite time consuming - only because you have to do it in steps, putting the pastry back in the fridge for periods of time. So firstly I'd suggest that if you want these for a breakfast treat start making them straight after dinner the night before, which is what I do. Although the first time I made them I timed it terribly and was up until about 2am! Or if you're having a day at home doing house work and other boring things you can make these in between and treat yourself for all your hard work; there is nothing worse on this earth than putting clean washing away, treats for after are required otherwise I'd have a floordrobe!
Anyway on to the recipe! It makes 12 croissants.
What you will need:
500g of strong white flour (bread flour)
300g of butter
1/2 tsp of salt
1 7g sachet of fast-action dried yeast
30g caster sugar
150ml of milk
150ml of very hot water
sunflower oil for greasing
1 beaten egg
First you need a big bowl because the mixture is quite big and you don't want to spill it everywhere! Add your flour, salt and 60g of butter and rub with your fingers until it looks like breadcrumbs.

Stir in the yeast and sugar. I'd highly recommend just buying the sachets of yeast if you can. Most recipes need a whole 7g anyway so you don't need to measure it out!

Make a well in the middle and add your milk and hot water. I boil the kettle and let it sit for a few minutes while I'm measuring my milk - it means you don't need to try and get reallyyy hot water out the tap! Mix it together with a wooden spoon until it's smooth and all stuck together - this takes a bit of elbow grease (or if you're weak like me, a lot!).


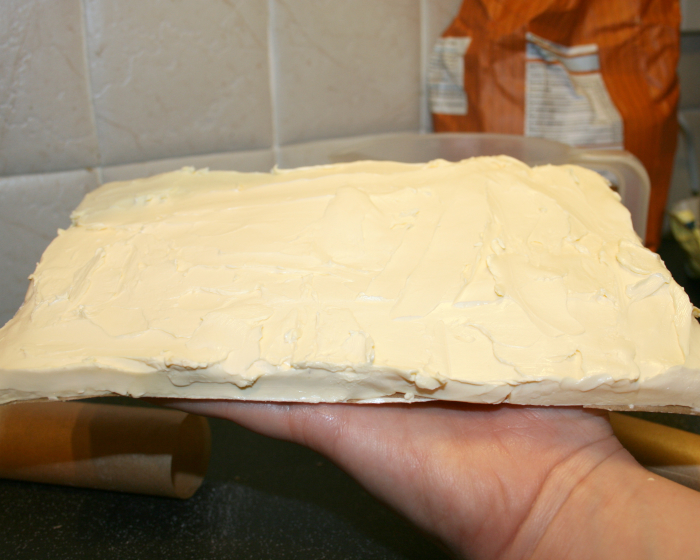
Cover with oiled clingfilm and put in the fridge for 2 hours. Next is probably the hardest bit! Take the rest of your butter and spread it over a baking parchment that's a 5x8 inch rectangle cover with more baking parchment and put that in the fridge too. (See pic below for what it should look like - it sounds more complicated than it is. It also helps if the butter is room temp when you do this part!)
Once the 2 hour wait is up, roll out your dough on a lightly floured surface so that it's width is slightly bigger than the butter rectangle and just over twice as long (see below again for photo). Then place your butter on covering one third. The dimensions look a little skewed in the photo, but I could comfortably fit two butter rectangles on this.

Next fold the top third of the dough into the middle and then fold the bottom third with the butter over that (like how you fold a letter basically). Seal the edges with your hands, wrap in oiled clingfilm and chill for 30 minutes.

Take it out of the fridge after the half hour and roll it out until it's the same size as before, then fold it exactly the same way. This just spreads the butter more evenly through the dough. Re-wrap and chill for at least a few hours before the next step. This is usually when I leave it over night so that I can make them in the morning. You want your dough to be quite firm before the next part.
So for me in the morning I take my dough and roll it on a lightly floured surface. Roll it into a rectangle that is wide enough for two reasonable sized squares and long enough for three. Then cut into triangles. Half the dough length ways once - and then twice width ways to make six evenly sized squares. Then half the squares diagonally. It sounds really complicated but you can look at the photo to see what I mean!

This is where you can add a filling if you'd like one! I add 90g of chocolate chips spread evenly between all 12 croissants. You roll them from the longest edge of the triangle across to the point in a "sausage" shape - and bring both points together in a C shape. If you're adding the chocolate chips place them along the longest edge before you roll them to shape. Place them on two baking trays (no need for oil because they're sooo buttery!) and leave them for about half an hour until they've doubled in size.
Finally, once they're ready pre-heat your oven to 220c (200c for fan assisted). Brush the tops with a beaten egg to get the gorgeous golden finish and pop them in the oven for 12-15 minutes until they look like croissants should! Once they're cool enough that you wont burn yourself you can get down to eating them. My favourite part!

It is a time consuming recipe and quite a bit of effort, but if you love croissants you'll love them EVEN more after trying homemade ones! They're so much more buttery than shop bought so there's no need to add any more. These will keep for a few days in an airtight container, but if like me you enjoy them warm they'll last up to a week! And if you're calorie conscious, these are around 352 calories each - so you can still enjoy the odd one mixed in with your healthy food choices - I know I do!

I'm not a huge croissant fan but mmm these do look/sound nice! Not sure I'm up to the effort of making them though haha xx
ReplyDeleteYou would probably like croissants more if you ate home made ones! I think the ones you buy can be a bit dry and flaky but I really love these :) xx
Deletethese look so good omg i got hungry just reading this post xx
ReplyDeletestephanieslook.blogspot.com
You should make them! They're so good :) x
DeleteThat looks so good Rebekah! I will try this one lazy day :) xx
ReplyDeleteI love them! I need to make them every week! I went to get one for breakfast this morning but everyone in my house has ate them all!! rage, I need them :( haha xx
Delete